I love Celtic knotwork. It is not a passion I come by honestly. There is no Celtic blood running in my veins (that I know of), but I love the geometry and the cerebral aspects the interlace patterns, so much that used it as part of my business logo.
![]()
Today I am going to share, step-by-step, the method used to create my own knotwork designs. I’ve used these designs on felted scarves, purses, and pillows, as well as in fine art pencil and ink drawings.


I follow a method devised by Aidan Meehan, whose books I highly recommend (more on those later). This tutorial is not intended to replace his comprehensive instruction, but simply to introduce the method and show where it can take you. When I learned this simple system, it felt like magic. While it takes a lot of practice and experience to visualize what a pattern will look like, the steps can be grasped in a single afternoon. Once they are, you can create full page designs as complex as you wish.
Throughout this post, you will find a handful of affiliate links. If you click on them and make a purchase, I earn a small percentage of the price you pay (at no additional cost to you). That said, you can complete this tutorial without purchasing a thing.
Basic Materials
Any kind of gridded paper (5 squares/inch or .5cm dot grid work well)
A black pen or marker of some sort
A pencil with a good eraser
Specific recommendations are included at the end of this tutorial.
*FREE PRINTABLE* Download printable practice sheets with the necessary dots and gridlines already laid out. Also included are some bonus exercises for practice and inspiration.
Step 1: The Grid
Knotwork is laid out on grid of dots. Actually, it is 3 grids that overlay one another. To create the Primary Grid, place small dots equally spaced and aligned both horizontally and vertically. Use a distance that makes sense for the spacing of the lines or dots already on the paper (3/8 - 1/2 inch or 1 cm apart works well). For practice, start with a grid that is 15 dots wide by 5 dots high. This grid is referred to by the number of square units on the horizontal and vertical axes, 14 x 4 in this case. At this point, I would use pen to create the grid, so that you don't accidentally erase it before you intend to.

The secondary grid (shown in pink, below) is created by placing a dot in the center of each primary unit. It is helpful to differentiate the primary and secondary grids. If you are using a single color, use a small + to indicate the secondary grid.

The tertiary (third) grid describes the path of the knotwork (indicated in green, below). Technically, it is formed by finding the places where the first two grids intersect, and connecting those points with a diagonal line. Practically speaking, draw (lightly, in pencil) diagonal lines evenly spaced between the primary and secondary grids dots. Once you get the hang of tracing the path of the knotwork, you may not need to see the tertiary grid at all. It will become easy to visualize without drawing it out.

It’s important to understand how the grids are laid out so that you can reproduce them on whatever substrate you want to use. However, these free printable practice sheets are a great shortcut when you just want to get drawing.
Step 2: Breaks
Breaks are lines drawn on the primary or secondary grids to indicate where the path of the knot turns. Knotwork without any breaks is known as a plait (shown below). To get those fantastically complex knots, you have to create breaks that force the path to turn in on itself and twist around.

There are three rules to follow when placing breaks.
- The outside edges of your primary grid act as breaks, defining the boundary of your design. In our case, this is the perimeter or our 14 x 4 grid, but it needn't necessarily be rectangular.

- Breaks are drawn vertically or horizontally, not on the diagonal. There are exceptions to this rule, but I’m not going to get into it. I am still trying to make sense of diagonal breaks, myself.
- Breaks on the primary grid (primary breaks, shown in black) and breaks on the secondary grid (secondary breaks, shown in pink) may not cross each other. However, primary breaks can be joined or crossed by other primary breaks, and secondary breaks can be joined or crossed by other secondary breaks. I know of no exceptions to this rule.

If you follow those rules, you can pretty much put breaks wherever you want them.
Creating a pleasing pattern is simply a matter of practice. The books listed at the end of this tutorial provide hundreds of patterns that can be used as starting points for creating your own. Additionally, the free PDF includes a couple pages of patterns I like to incorporate in my designs. Some of my favorite patterns are discovered by choosing a grid size (i.e. 8 units wide by 2 units high) and trying as many configurations as I can think of that will fit in that space. Many will be duds, but a couple may peak my interest and inspire further exploration.
Breaks can be drawn in pen or pencil. There is no need to use different colors, just be sure that primary breaks don't cross secondary breaks.. I recommend starting with a repeating and/or symmetrical pattern. Symmetry can be reflectional (mirror image), or rotational (looks the same when rotated). Most often, I use a combination of all three (repeating patterns and reflectional and rotational symmetry) to create a pleasing design; but you may prefer a more random outcome, with breaks drawn willy-nilly. Lay out some primary and secondary breaks on the 14 x 4 grid you created in Step 1. In this example, I picked some break combinations I have not used before, just to see what happens. Yours may look completely different; just be sure to follow the rules above.

Step 3: The Path
So now we have our grid with breaks drawn on the primary and/or secondary grid. It is helpful to think of the outside edges of the grid as being primary breaks, as the path should not cross the edges. There are two rules for drawing the path of a knot:
- The path should continue straight on the tertiary (green) grid until it must turn to avoid hitting a break.
- Once the path has been deflected by a break, it should return to the tertiary grid at the next opportunity.
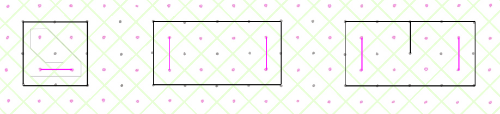
Try tracing the path for these 3 simple knots. Click the image to see the correct paths. You can create the dot grid on your own paper (the first is 2 x 2, the second and third are 4 x 2) or download the exercises here. Pick a spot along the green grid. Anywhere that is not right next to or on a break. In either direction, follow that line in pencil. Stay on the green line until you must turn to avoid a break. At that point, turn 45 degrees and run parallel to the break until you either have an opportunity to turn back on to the green path or must turn to avoid another break (whichever comes first).
Now back to our 14 x 4 grid. Some break patterns make for strange pathways, but the rules are always the same. Stay on the green line and don’t turn until you must to avoid a break.

Step 4: Smoothing the Path
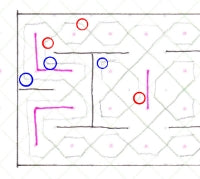
When drawing a path, you will find there are 2 types of turns: 45 degree turns (“wide turns” indicated with red circles below) and 90 degree turns (“tight turns” indicated with blue circles below). Most of the time, I round over any wide turns, and I sharpen any tight turns. Once you are comfortable with following the path, you will not need to do steps 3 and 4 separately. I automatically round and smooth the path as I draw it.
How rounded or sharp you make the path is just a matter of preference. Sometimes I like very smooth circular patterns, and sometimes I prefer to emphasize the “squared off” look. Once the basic path of the knot is laid out, it can be shaped and manipulated in more extreme ways to fit the space you wish to fill or create the shapes you desire. When making large sweeping curves, be sure your path stays on course.
Smooth the path of your 14 x 4 panel.

Step 5: Over and Under
As simple as this step is, it is also so easy to mess up. The easiest way to get the “woven" effect is to use a dark pen or marker with a relatively thick line. I use Pigma Micron in the 08 (.5mm) or 05 (.45mm) size when am drawing simple line work. Where the path crosses itself, it alternates whether it passes over or under.
Pick anywhere to start. Follow the path as it crosses “over” itself once, but stop before it crosses a second time. Leave a space where it crosses “under” itself, and then pick up the line again on the other side. Continue this pattern, over and under, until the whole piece is done. If your design is not made of one continuous cord, make sure to start the second cord where it crosses the part that’s already done so you get the over/under pattern correct.

What can make this step tricky is, depending on the break pattern, sometimes the space between crossings is very short, and sometimes it is long. It makes it easy to lose track if you are not paying close attention. I find that it’s better to focus on getting the curves right in pencil before inking the over/under pattern. If I try to smooth the curves and establish the over/under pattern at the same time in pen, I invariably mess it up. If you look closely, you will see that sometimes, I mess up anyway.
At this point, you can erase any pencil lines and see what you have. If there are parts of the design I don't like, I rework the break pattern in those areas and try again. It often takes 3 or 4 tries to get the design looking just how I want.

Bonus Exercise
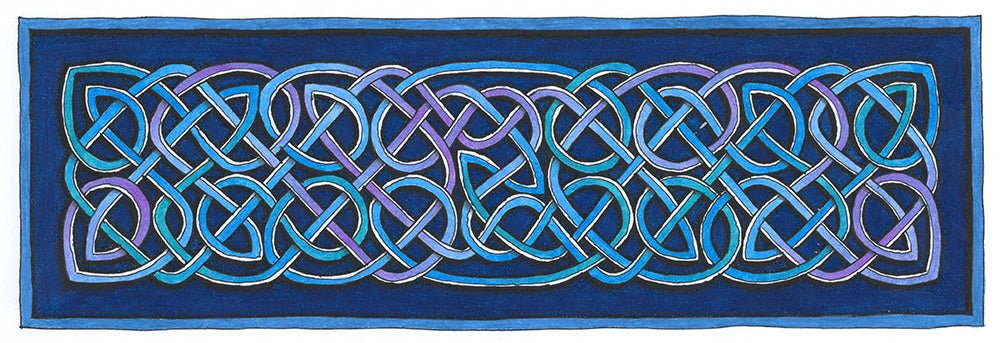
Take a look at the image at the top of this post. Knowing what you do about the triple grid and break patterns, can you draw the grid and breaks required to produce that design? Give it a try on some practice paper, then compare your results to the image below.

My Favorite Resources and Supplies
Books
Aidan Meehan has many excellent books on Celtic design. There are two, in particular, that explore many break patterns and their resulting knots. I own both of these books and refer to them extensively.
Celtic Knots: Mastering the Traditional Patterns is a step-by-step guide to the triple grid method. In the book he systematically runs through traditional break patterns and the different ways they can be combined. It then gives you space, in the book, to fill in the resulting knots. This is the book that set me on my way. It is set up as a twenty-week course, but I still frequently use it as a reference. Sadly, it seems this book may no longer be in print. It is only available from Amazon through 3rd party sellers and mostly used. The few new copies available are quite pricey ($50+). Regardless, I think it’s worth getting your hands on, new or used.
The Treasury of Celtic Knots covers similar material, but includes some really interesting patterns that aren’t in the first book. I found the discussion of knots and their construction to be much more confusing in this book. He does use the triple grid method, but getting to that point not as straight forward and wanders into tangents I don’t always understand. However, the knots in the book are fantastic. I refer to it often as I design my own knots.
Supplies
I recently purchased these beautiful hardcover journals for another purpose, but soon found that the dotted grid was well spaced for knotwork design. The pages are smooth and take most ink without bleeding. Pencil lines erase without tearing the paper. The medium size Leuchtturm 1917 (5.75” x 8.25”, or A5) is suitable for smaller designs and nicely portable. It comes in black and a rainbow of colors. The Leuchtturm 1917 Master notebook offers large 9” x 12” (or there about) A4 size pages, perfect for full page designs. I currently use the A4 size as my business journal, but plan to purchase one soon just to keep a compendium of knotwork designs. Both sizes include 2 ribbon bookmarks, numbered pages, and an index.
The hard cover journals are pricey, but there are many options on Amazon when it comes to dot grid paper. I can't vouch for the quality of the paper, but they have loose leaf, note pads, and all manner of bound notebooks.
Pigma Micron pens are excellent for doodling of any kind. They work well in the Leuchtturm Journals